Complete POS ERP Systems for Effective Stock Management and Point of Sale Solutions
Introduction to Complete POS ERP Systems
In the rapidly evolving landscape of retail operations, integrating technology into business processes is essential for maintaining competitiveness and efficiency. At the forefront of this digital transformation are POS (Point of Sale) and ERP (Enterprise Resource Planning) systems. A POS system acts as a critical transaction point where sales occur, enabling businesses to process customer payments, manage sales data, and enhance customer interactions. On the other hand, ERP systems serve as comprehensive management software that integrates various business functions, including inventory management, financial accounting, and customer relationship management, into a single unified framework.
The combination of POS and ERP systems offers retailers a powerful tool for optimizing operations. By connecting sales data directly to inventory management, businesses can gain real-time insights into stock levels, ensuring that inventory is accurately tracked. This seamless integration facilitates better decision-making, enabling retailers to forecast demand, manage stock efficiently, and minimize instances of overstock or stockouts. Furthermore, by streamlining customer interactions—recording preferences and purchase history—businesses can enhance customer satisfaction and loyalty through personalized service.
Investing in the best POS ERP solutions offers various financial and operational advantages for businesses of all sizes. It allows for enhanced operational efficiency by automating routine tasks, thereby freeing up valuable time for staff to focus on higher-level responsibilities. Moreover, with data analytics capabilities, employees can tap into valuable insights regarding sales trends and customer behaviors, aiding in strategic planning and stock management. As a result, the integration of robust POS and ERP systems is not just an option, but a necessity for businesses seeking sustainable growth in today’s competitive market. The forthcoming sections will delve deeper into the key features and benefits of the leading POS ERP systems available today.
Key Features of the Best POS ERP Systems
When evaluating the best POS ERP systems, several key features effectively distinguish them from less capable solutions. These features enhance user experience and ensure seamless stock management and point-of-sale operations. One of the most vital elements is real-time inventory tracking. This function allows businesses to monitor stock levels as sales occur, enabling immediate awareness of low inventory, thereby facilitating timely reordering and minimizing stockouts.
- Multiple Business/Shops:
- Set up multiple businesses in the application.
- No restriction on numbers of businesses.
- Inventory & accounting information is kept separately for each business.
- Add Location / Storefronts / Ware House:
- Create multiple locations for your business/shop
- Manage all of them at the same time.
- Stocks, Purchases, Sell can be tracked differently for locations.
- Customize invoice layout, invoice scheme for each location
- User & Role Management:
- Powerful user and role management system
- Predefined roles – Admin & Cashier
- Create different Roles with permissions as per your needs.
- Create unlimited users with different roles.
- Contacts (Customer & Suppliers):
- Mark contact as customer, supplier, or both(customer & Supplier)
- View details of transactions with a contact.
- View the total of the Credit/Debit balance amount
- Define pay terms and get payment alerts a week before the due date.
- Products:
- Manage Single & Variable products.
- Classify products according to Brands, Category, and Sub-Category.
- Add products having different units
- Add SKU number or auto-generate SKU number with prefixes.
- Get stock alerts on low stock.
- Save time by auto-calculating selling price, the system is smart to auto calculate selling price based on purchase price and profit margin.
- No need to type variations every time, create a variation template and use it every time you need to create variable products.
- Purchases:
- Easily add purchases.
- Add a purchase for different locations.
- Manage Paid/Due purchases.
- Get Notified of Due purchases the week before the pay date.
- Add discounts & Taxes
- Sell:
- Simplified interface for selling products
- Default Walk-In-Customer automatically added to a business
- Add a new customer from the POS screen.
- Ajax-based selling screen – save reloading time
- Mark an invoice for draft or final
- Different options for payments
- Customize invoice layout and invoice scheme.
- Manage Expenses:
- Easily add business expenses
- Categorise expenses
- Analyse expenses based on category and business locations with the expenses report.
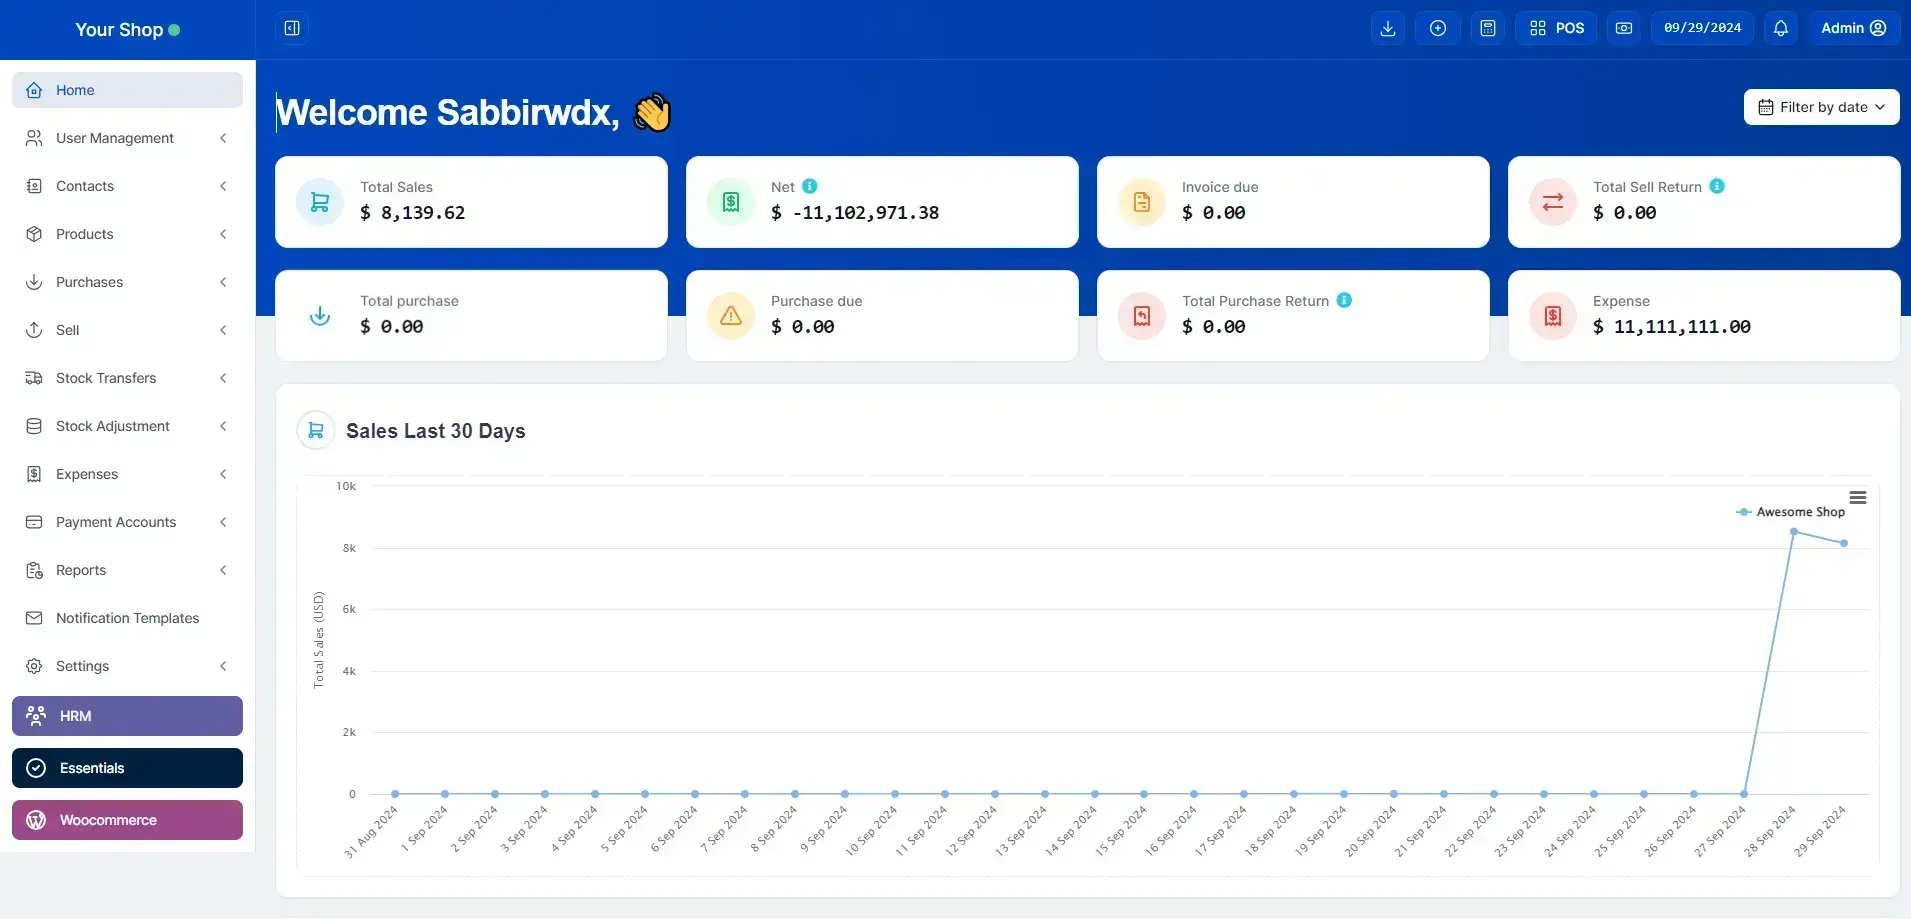
- Reports:
- Purchase & Sale report
- Tax Report
- Contact Reports
- Stock Reports
- Expense Report
- View Trending Products, drill down by Brands, Category, Sub-category, Units, and date ranges
- Expense Reports
- Cash Register Report
- Sales Representative Report
- Other useful features:
- Set the currency, timezone, financial year, and the profit margin for a business.
- Translation ready.
- Predefined barcode sticker settings.
- Create your barcode sticker setting
- Manage Brands, Tax Rate & Tax groups, Units, Category & Sub-Category
- Easy 3-step installation.
- Detailed documentation
- Stock Adjustment
- Express Checkout
- Works Offline
Complete POS inventory management in PHP | Free Download

Installing in Livehost:
1. In case you want to install the system in hosting, here are the steps:
- 3.0 Make sure the URL of the application is like www.yourwebsite.com or any-subdomain.yourwebsite.com for a better experience. Installing in folders like www.yourwebsite.com/any-folder-name/pos is not recommended.
- 3.1 Upload the extracted POS zip file (all files & folders inside POS-Code) to the server document root.
- To upload the file, you can use an FTP client like Filezilla (https://filezilla-project.org/)
- Or you can upload it directly by logging into your cPanel (or direct admin) & going to file manager.
- 3.3 Open your website http://your-pos-website.com/install or http://your-pos-website.com/public/install
- 3.4 Make sure all show a Green-Tick. If there is something with the Red Cross, then fix it and refresh the page to check again. After all, Green-Tick clicks on “Go to Next Step.”
- 3.5 Follow the installation instructions as displayed on the screen.
- 3.6 You will see the installation page as given below, or if it shows some error, then check the debugging error notes given below.
- 3.7 After all installation is done, go inside the public folder and delete the install folder present.
2. “Doing some pre-installation checkup.” Screen: Make sure all are marked with a Green-Tick, then click on “Next Step.”
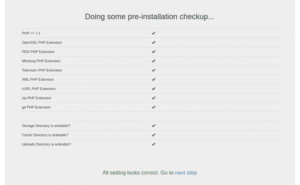
On clicking “Next Step,” it will go to the Installation screen as shown below in step 5.
Not Found Error: If it shows a not found error after clicking on the “Next Step” link, then try changing the link as below:
– www.yourwebsite.com/public/install-start
– www.yourwebsite.com/public/index.php/install-start
(To remove index.php from the URL, make sure you have mod_rewrite enabled; contact your hosting for more details)
3. POS installation screen:
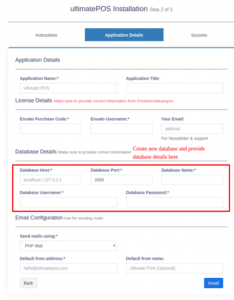
- Click on the next “Let’s Go”. It will check your server. If all of them are green, then you’re ready for the next step; else, install the missing PHP library. After everything looks correct, it will show a green sign.
“You must type a file name.” Error in Windows: Check the steps mentioned at the end with the heading – (creating a hidden file in Windows)
- Click on “Install” after this and wait for a few minutes to process (1 to 10 minutes depending on hosting)
- It will display an install success screen.
Installation is already done:
If you want to overcome this message:
Delete the .env file present in the POS project document root, and then it will work.
Conclusion
We hope this article helped you know about “Complete POS ERP Systems for Effective Stock Management and Point of Sale Solutions”. If you like this article, then please share it with your friends.
Also, if you require any help related to the website and SEO. Sabbirwdx Team is always ready. Check Out Our Team Service. Sabbirwdx Team, Professionally Website Solution Providers And Search Engine Optimization Experts.
Don’t forget to subscribe to our YouTube Channel for WordPress video tutorials, Facebook, Twitter, and Pinterest.
Thanks for visiting Sabbirwdx and reading this article! We highly appreciate it!